It is so very important to dry your harvest properly. Fortunately, there are several options to do so, from low tech methods to complex drying machines and several options in between. Properly dried cannabis will provide the end user with a smooth and flavorful product, and an enjoyable experience. The manner in which drying occurs, and the time taken, will dictate how well terpenes and flavonoids are preserved. This is a delicate balance and partially depends on what the grower is trying to highlight.
Different terpenes dissipate at different temperatures. Improperly dried crops lose too many terpenes and can be at best, bland, and at worst, very harsh and unpleasant. Drying buds utilize their stored moisture and carbohydrates. If they dry too fast, they will use fewer carbs, and the result will be a harsh smoke.
Every grower will need to adjust their drying space to try and achieve an optimal drying environment. In general, the air temperature for drying should be between 60 and 70 degrees F (15.5 to 21 C), and the humidity level should be between 45 and 55 percent. Air circulation is also important to achieve even drying and to reduce the chance of disease formation.
A variety of components can be used to adjust these variables. Fans, air conditioners, humidifiers, dehumidifiers, and heaters can and may need to be employed to create the ideal drying environment. A dim light can be left on in the drying room, but for the most part it should be a dark environment.
Adjustments may need to be made during the drying process to maintain the desired climate. Checking the drying buds every day is important in order to make any adjustments in a timely manner. Before getting anywhere near this point, it is important to make sure that the drying environment, and anything that may come in contact with your drying harvest has been sanitized. Before utilizing a space for drying, everything should be cleaned with a hydrogen peroxide solution.
Cleanliness at all stages of the process is important too. Anyone who handles the drying or dried harvest should be wearing disposable gloves at all times. While not often an issue in larger operations, keeping pets out of the drying area is critical and any fur or dander they shed can land on and stick to drying buds. A UV sterilizing light can be added to the room as well as a carbon filter to help kill or absorb particulates and bacteria.
Once your room is prepped, you are ready to begin the process of drying your harvest.
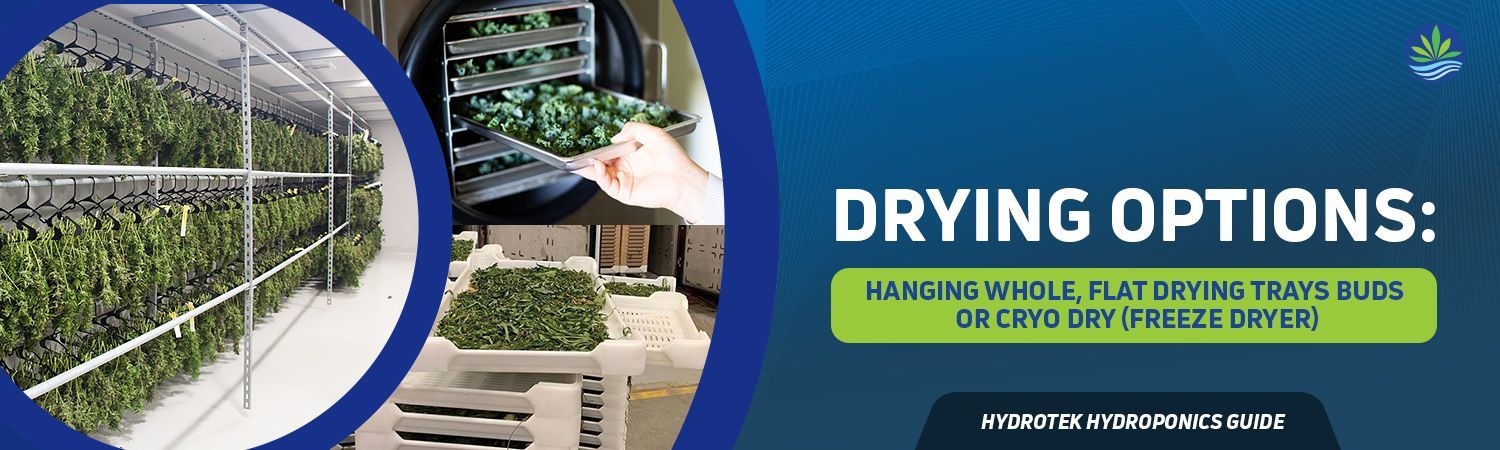
Hanging whole
Hanging whole branches, or the hang-dry method, is the easiest and longest-standing method to dry the harvest. It requires little more than space to hang, some type of line or rack to sting it up and clips or clothespins to keep each branch in place. Even though it is very low tech, there are many large-scale, professional growers who still prefer this method of drying.
While it may seem self-evident or obvious how to perform this method of drying, there are some things to keep in mind that will make the process more successful. Establishing and maintaining a clean environment with the right environmental conditions is critical. Make sure that the location for drying is dark, not too hot, and not too dry. Proper humidity for drying is crucial. Once the environment is conducive, then it is time to set up the drying equipment.
If using string or line, it is important to make sure it is both strong enough and pulled tight enough to hold the weight of the drying branches, which will be at their heaviest once strung up. A drying rack is another good option for whole-branch drying and can take up less space. Do not use trays for this as they will lead to uneven drying. Air has to be able to fully circulate around each branch.
Cut down the branch to no more than 12 inches or so (30 cm) in length. This will speed up the drying time and allow for better circulation. Then, trim off all excess or unwanted leaves. These can be discarded or saved for making edibles or other extractions. Next, hang the branches upside down so that the buds are facing the floor. Whether hanging on a line or on a drying rack, make sure that they are spaced far enough apart so that they are not touching one another. This will help to prevent mold and bacteria from establishing. Check daily to make sure there are no signs of any fungal presence while drying.
Allow the branches to hang for several days. Each grower has a different window based upon their environment, but the harvest should hang for at least 5 days, up to 14 days. To know when hang-dried cannabis is ready for the next step, test a bud to see if it snaps right off cleanly. If it does not, there is still too much moisture and the crop needs to hang longer. Rushing the process will not pay dividends. Leave them hanging as long as needed and you will be rewarded with better fragrance, taste, terpene profile, and medicinal effects.
Flat Drying
Another method of natural drying is the process of flat drying. Flat drying is a good choice for growers who do not have the space to hang their plants. It is arguably an easier method than hanging, uses less area, and allows for a quicker drying time. Like with hang drying, the branches must be cut off of the plants. Then, though, they should be placed on a flat surface that allows for circulation. This could be mesh, something with holes in it, or if that is not possible, cardboard can be used if the buds are constantly rotated (every few hours).
Once the branches have been laid flat to dry, it is important to make sure the temperature and humidity remain at proper levels so as not to invite mold problems. This process can be complete in as little as five days, but can take up to ten. Once a bud can be snapped off cleanly from the branch, they are dry enough for the curing process. Each bud can be plucked off and sent on to the next phase of the journey.
Cryo (Freeze) Drying
Cryo-, or freeze-drying your harvest, also known as lyophilization and cryodesiccation, is a great option for those with the technology to do so and don’t have the time to process the harvest right away. With degradation starting immediately after a stem or bud has been cut from a plant, cryofreezing can prevent the loss of cannabinoids and terpenes by shutting down the degradation process. This method of preservation has been used in many industries with success for decades, especially in food and drug manufacture.
This drying process involves placing the harvest into a vacuum chamber where it is dehydrated instantly. All compounds and elements are preserved. The freeze-dried cannabis is now lightweight, shelf-stable, and has essentially all of the properties it had while still actively growing. This helps the producer to achieve a superior product that retains all of its potency and therapeutic properties. It can also help to fetch a higher retail price due to its higher quality.
Additionally, this method, in addition to allowing for a longer storage period without losing quality, creates a lightweight product that is easier to transport. While no method can eliminate all chances of mold or disease, because the harvest is instantly dehydrated, the chance for bacteria and other diseases is greatly reduced.
Few consumers and producers argue the quality of freeze-dried cannabis, but it is not an option for many growers. A significant investment must be made to purchase the right equipment to be able to cryo-dry the harvest properly. This can be just the thing needed for a grower ready to expand their operation, but not likely a realistic option for new or small-scale growers.
Other Drying Options
Overwhelmingly growers opt for one of the three drying methods laid out above, but they are not the only options. Depending on each grower’s unique setup, and the equipment on hand, one of several other ways to dry their crop may be selected. Some are just modifications of the above outlined methods and others involve different components or equipment.
Vacuum sealing is another way to dry a harvest. Trimmed while wet, the buds are immediately placed into a plastic bag. The air is then sucked out of it and the bag is sealed. This method can help to prolong the freshness of the buds but does not allow for the full expression of terpenes or cannabinoids. Cryo, or freeze-drying, is more effective for preservation of those aspects than vacuum sealing.
Other drying equipment that can be used include kilns and humidors, or other drying boxes. Commercially produced enclosures such as grow tents, with a hygrometer, dehumidifier, and thermostat can get the job done, while other low-tech growers can DIY a solution. A large cardboard box, or one constructed of wood, plastic, or even drywall can be an effective alternative if the climate can be controlled.
A simpler way to dry is by using a bag. A good, old-fashioned paper bag can be used for drying. The higher level of humidity in the bag versus the room it is in slows the rate of evaporation. The bag will have to periodically be opened and then reclosed to recirculate the humidity. The more buds put in the bag will result in a higher humidity environment; the fewer buds conversely, will create a lower humidity environment. This is a low-tech way to be sure, but can be done for small-scale growers who may have few options. The addition of a hygrometer can help to better manage the humidity level in the bag.
Another option is to use any “regular" room or closet for drying. This can employ either a hanging whole or lying flat approach. By creating a closed, humidity-neutral space, and properly balancing the climate with the use of some combination of humidifiers, dehumidifiers, heaters, fans, or air conditioning, can turn almost any space into a drying space.
While most growers opt for hang-drying or flat-drying, in some cases, any of these other methods can fit the bill for growers of any size. If you have the equipment, you might as well use it.
Considerations and Other Drying Tips
Whether you opt to dry whole plants, or trim first and then dry, there are some things you should consider doing for better results. Before the drying process has begun and your buds are still attached to your plants, some pruning should be done. Before flowering is complete, thinning out some of the branches should occur to allow for better light distribution across the crop’s canopy.
Ensure that your environment is conducive for whichever style or method of drying that you choose. Your drying environment should be dark and cool. Temperatures should be about 60 F, (15-16 C) with humidity in the 55-60 percent range. Lower temps will prevent drying fast enough, which will result in a bad end-user experience. Higher temperatures or humidity will encourage disease.
If you opt for dry trimming, as many growers do, make sure you take a couple of additional steps that will improve your final product. Cut off large fan leaves. This should be done before hanging your harvest on drying racks or other hanging locations or equipment. Keep the smaller fan and sugar leaves on though to allow for a slower drying process.
Check your hanging or laying harvest often for brittleness. Once the cannabis is dry on the outside and stems snap instead of bend, it is time to trim. At this point all remaining fan and sugar leaves can be removed. If you will be making any additional products such as concentrates or infusions, save the sugar leaves for further processing later.
If you do opt for dry trimming and whole plant-hanging, make sure that you have the space to do so. Assume that you will need an area to dry that is about 75 percent of the area needed for your grow. Less than this could create a situation where too much humidity is trapped due to poor air flow around the plants.
After looking at all of the options and methods for drying, it is worth noting two situations where cannabis should not be dried…ever. Your harvest should never dry in an environment where there are actively growing plants of any kind. The conditions required for growing and the conditions for drying are at odds. At best, the quality of the buds will be reduced to loss of terpenes. At worst, mold and disease will set in, destroying the harvest. Keep these two phases completely separate.
Any completely enclosed or air-tight environment should also be avoided. This includes sealed boxes, jars, or any container that traps and seals in air. The drying process needs air flow. Built-up humidity needs a place to escape. Otherwise, you are creating the perfect environment for rot, mold, mildew, and even bacteria to set up and thrive. Growers lacking options for drying can use these items if they continually open up the containers to release excess humidity. This “burping” needs to be done frequently or else the humidity level can quickly build up to levels supporting mold and disease.
After Your Crop Has Dried
No matter what method of drying you choose, make sure that you finish the job. Once the chlorophyll in your buds starts to degrade, and the yellows, browns, reds, and purples become more prominent, and most importantly become brittle enough to snap off, curing can begin.
Using curing bags or jars, and making sure to let air out of them (burping) regularly will help to make sure that all of the moisture has indeed left the bud. This final step, making sure that your harvest has fully gone through the drying and curing process will make sure that you end up with a premium final product that will have your customers lining up for more.


